Wednesday, April 30, 2014

Recycle with Arts and Crafts

 
Congratulations to Deb Smith of Deb Upcycles shop on Etsy for her creative idea on turning an old shirt into a knitting bag.  You can find the how-to instructions and illustrations on Deb's blog:  Debsgoinggreen.BlogSpot.com

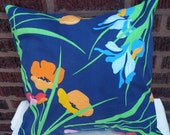
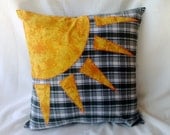
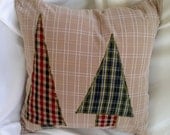
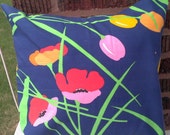
Visit Deb's Etsy shop Deb Upcycles for more up-cycled items, such as these beautiful pillows below:


Upcycled Accent Pillow Cover Floral Blue 16 Inch Square 16 X 16Blue Flower Upcycled Decorative Pillow Cover 18 Inch Square 18 X 18


Bright Sunshine Pillow Cover 18 X 18 Green Plaid, Batik Look Sun Applique Upcycled Men's ShirtPlaid Trees Pillow Cover 14 X 14 Tan, Red and Green Applique Upcycled Men's Shirts


To find out more about these and other unique items, browse through featured items in
Team Bloggers and Dreamers Catalogue.


DIY and Etsy blog is part of Bloggers and Dreamers Team on Etsy where experienced shop owners share their knowledge on arts and crafts products.  If you would like to have your DIY project featured on this blog, join our team and post it to the DIY blog thread.


Blogger Debra Young
Captain of Bloggers and Dreamers Team
Owner of Earth Hearts and Florida Beach Finds


Monday, April 14, 2014

Making Wire Wrapped Earrings with Crystals and Hearts by Dita Basu


Meet Dita Basu of Alankarshilpa Jewelry...guest blogger from Etsy Bloggers and Dreamers Team. "My passion is wire work and knitted jewelry.  I integrate healing gemstones, crystals, pearls and whatever I find that creates beautiful, unique jewelry."
 
I made these wire wrapped earrings by weaving wire and using Swarovski pink crystals and garnet beads. I got so carried away that I made quite a few pairs with different colors and sizes. The thing I learned that you have to keep the inside circle beads smaller than the outer circle beads. You’ll know what I mean when I show you the tutorial.
 

Materials Used
15 pieces of 4 mm pink Swarovski Bicone Beads

(Fire Mountain Gem H – 20- 9757 CY)
5 pieces of 3 mm size garnet beads
(Fire Mountain Gem H-20-6917 KX)
28 g silver plated wire
(Fire Mountain Gem H-20-1451WR)
2 French sterling silver ear hooks
(Fire Mountain Gem H-20-4902FN)
2 heart silver beads(from Just Bead It, my neighborhood beading store)
Note:  I have no monetary affiliation with any of these stores. I am giving the reference because these are what I have used.


Tools Needed
Round nose pliers, chain nose pliers, flush cutter.


Procedure
1.  Cut the wire to a length of 12” (30 cm)
2.  Bring the two sides of the wires closer with both hands.


3.     String two pink bicone beads at the left hand side wire.
4.     String one garnet bead at the right hand side wire.


5.     String another pink bicone at the left side wire.
6.     Pass the right hand side wire through this pink bead.  Pull tight.


7. String two pink bicone beads at the left hand side wire.
8.     String one garnet bead at the right hand side wire.
9.     String another pink bicone at the left side wire.
10.  Pass the right hand side wire through this pink bead. Just like last time. Pull tight.


11.  In the same way string all the remaining garnet and pink bicone beads, each time pulling tight so that it forms a nice circular shape and the wire does not show.

12.  Now let the right hand side wire go through the closest left side bicone bead. Pull tight.


 13.  With the fingers of your non dominant hand hold it tight, close the gap if there is any.
14.  Now gradually twist the two wires to a single twisted wire. Twist quite a few revolutions. I did about ten or twelve until you have it nice and tight and also enough length (like a couple of inches).


15.  String the heart bead now.
16. Make a wrapped loop. (Visit firemountaingems.com for directions on this step).
17.  Cut off excess wire.


18.  Insert it into the French ear hook loop.
19.  Make another one to complete the pair.


Voila!  Your pink crystal and garnet earrings are ready to wear.  They’re perfect for Valentine’s Day or whenever you’re in the mood for hearts and crystals.


Jewelry designer, Dita Basu is a member of Etsy team, Bloggers and Dreamers.  Her beautiful wire wrapped jewelry pieces can be found in her Etsy shop, Alankarshilpa Jewelry.


Blogger Debra Young 
is Captain of  Etsy Team
Bloggers and Dreamers
 (Team BAD)
Non-Etsy members are invited to join Etsy Bloggers and Dreamers team and network with a creative group of artists, crafters, and vintage collectors. 
Contact Debra at Earth Hearts or Florida Beach Finds for more information. 


Tuesday, November 19, 2013

Making Paper with Plants – Part 2 by Sue Forey


In the previous posting, we did the preparation for paper making and are now ready to go ahead and form sheets of paper.

In your plastic tray you need to make a mold. This is simply 3 layers of newspaper. Fold the bottom one in to a small rectangle, the next in to a larger rectangle and sit it on top of the first one. Next put on the top piece of newspaper which should be bigger again. Cover with a damp cloth and you should have a little hill.


Now in your other plastic bowl mix the pulp with enough water to scoop your deckle and frame into. I couldn't photograph this part as I only have one pair of hands.


Hold the deckle, net side upper most with the frame on top. Now scoop the deckle and frame in to the pulpy water mix. Start at a 45 degree angle and level out as you go. Shake from side to side and back to front as you bring it out of the water then hold it there until the water has drained out. The pulp should evenly cover the netting with no holes. If you have holes tip it all back in to the water and start again.


Move to your mold and tip the pulp out of the deckle and on to the mold. Cover this with another piece of damp fabric and continue until all of the pulp is used up. Make sure to stir the pulpy water in between each sheet of paper so the vegetable matter does not all sink to the bottom.


The next stage is drying. With the paper still on the fabric take them and lay flat in a warm room to dry. This will take at least 24 hours. When dry peel the papers off of the cloths and hey presto…you have paper!


To be honest my paper was a little brittle and crinkly. I would not use broccoli leaves again. I have had success before with other vegetation though so don't be put off. Probably best to start with grass or hay.


Have fun!

If you have any questions about the instructions, please contact me through my Etsy shop, Sue Forey - Fibre Art.


Artist Sue Forey is a member of Etsy team, Bloggers and Dreamers. Her beautiful works of fibre art can be seen in her Etsy shop.


Non-Etsy members are invited to join Etsy Bloggers and Dreamers team and network with a creative group of artists, crafters, and vintage collectors. 
 
Contact Debra at Earth Hearts or Florida Beach Finds for more information.
 
Blogger Debra Young is Captain of Bloggers and Dreamers Team (Team BAD).


Tuesday, November 12, 2013

Making Paper - Part 1 by Sue Forey

Bloggers and Dreamer's Etsy Team aka Team BAD is made up of talented, creative and experienced members who are willing to share their expertise.  Our first featured member is Sue Forey of Etsy shop, Sue Forey – Fibre Art.  She has generously provided free instructions for making home-made paper. 
 
Be sure to stop by Sue's shop where you will find the most wonderful, whimsical and original works of art that are sure to capture your imagination and make you smile.
 
Debra Young, Captain, Team BAD

Happy Tuesday, November 12, 2013


Sue Forey - Fibre Art

Sue Forey was born in England but moved to Wales about 10 years ago with her husband and children.  She raises animals and grows vegetables on their farm.  Sue makes felt from the wool of her sheep and paper from vegetables that grow in her garden.   To read more about Sue and to see her beautiful works of art, visit Sue’s Etsy shop


Making Paper with Plants – Part 1 Pulp Making Process

After my mixed media post in which I used handmade paper, I've been requested to provide instructions on how to make it. You can, of course, make paper from recycled paper or buy pulp ready to use… but it is soooo satisfying to make it from raw products that you have gathered yourself.

Theoretically, paper can be made with any plant - fresh or dried but some plant materials make better paper than others. All types of grasses, even dried in the form of hay, make good paper. But why not try something else and experiment? Have a look around your garden if you have one. If you are a city dweller, check out roadside weeds and fallen leaves in the park. I chose to use the tough, outside leaves from broccoli plants because I have a lot of them in my vegetable patch. They were a nice reddish green color and I thought they might make an interesting colored paper. Do remember that the color of your plant material will affect the color of your paper so if you want writing paper use pale plant material.

Before you start there are a few things you need. Probably the most important is your deckle and frame, which are the tools you will use to scoop up the pulp and shape it in to paper.  The deckle is a wooden frame covered in mesh. The frame has to be of the same size as the deckle but without the mesh.  You could use 2 picture frames of the same size and staple old net curtain to one.
 
      
Deckle


Equipment and Supplies Needed:

  • Deckle, wooden frame covered in mesh.
  • Frame, without mesh.
  • Large stainless steel or enamel cooking vessel. I used a bucket.
  • Large plastic vat. It has to be a bit bigger than your deckle. I used a plastic cat litter tray.
  • Sheets of fabric, a little bigger than the deckle. Reusable kitchen cloths are OK. 
  • Two pieces of board. If you are using edible plants you could use chopping boards.
  • A solution for cooking your plants that will break down the cellulose. The best liquid is wood ash lye. For some people this may not be practical to make in which case you can add *washing soda to your cooking water.
  • A blender. If you do not have a blender, you can put it in a large container and beat with a heavy stick…maybe a rolling pin.
  • Plant material

If you are making the wood ash lye here is the recipe.

  • 1 bucket of wood ash from a 100% wood fire
  • Enough water to cover the ash
NOTE:  Make sure the room is well ventilated as this stuff smells!

Boil the wood ash in water for 1/2 hour and leave to soak overnight. In the morning, strain through some netting. KEEP THE LIQUID and discard the wood ash. You will end up with a disgusting brownish-pink liquid like shown in the photo.


Next, you need to pick your plant material. You can see my broccoli leaves below.


At least a bucket full will be needed. Now you have to cook the plants in the wood ash lye or *washing soda. Use the stainless steel or enamel pot and bring to a boil. Cover and cook until very soft. Grass cuttings take at least an hour. My broccoli leaves took 1 1/2 hours. Make sure that they are covered with the liquid. If you don't have enough you can add a little water. Again make sure you have enough ventilation.

When you have very soft vegetation, you can strain.  This time discard the cooking liquid and keep the plant matter.  There will probably still be lumps of plant in the pulpy mass.  So, whizz it through a blender until it looks the picture shown.  If you do not have a blender, you can put it in a large container and beat with a heavy stick…maybe a rolling pin.

Your pulp is ready to use.

*Note:  Washing Soda is known in United States as powdered laundry detergent and can be found in most supermarkets. Be sure to use detergent that is sodium carbonate. Mix 3.5 ounces detergent to 8 quarts of water. That is 100 grams to 8 liters.  Another product you can use called soda ash which can be obtained from papermaking and ceramic suppliers.

Next:  Paper Making Process


Blogger Debra Young
Captain Etsy Team BAD
 (Bloggers and Dreamers)
 
Visit Debra's Etsy shops:

 
If you are interested in blogging, join us at Etsy on the Bloggers and Dreamers Team.  Non-Etsy shop owners are also welcome to share their blogs on our team threads.

Tuesday, November 5, 2013

Coming Soon

Instructions from artists and crafters coming soon!